Generally, a BIOS update should only be performed if a system causes problems or if new security updates for the system are installed by a BIOS update.
With a BIOS update, the default settings are restored, if you have made changes, these must be set manually again after the update.
The update for Gigabyte servers can be found online via the Gigabyte website.

Gigabyte website, additional remarks added by us (Source: gigabyte.com)
The latest version is usually at the top, also recognizable via the datestamp. There are several folders in the download and there are several options to flash the BIOS. It is also important to note the revision of the server. With Gigabyte AMD servers, for example, the same systems can have different revisions, where different CPU types are supported. In the following a short table, which BIOS versions support which CPUs.
| BIOS version | CPU generation |
|---|---|
| F | AMD Epyc 7001 (Naples) |
| R | AMD Epyc 7002 (Rome) |
| M | AMD Epyc 7003 (Milan) |
Otherwise, if in doubt about the revision, download the BIOS whose initial digit is already flashed. For example, if F19 is flashed, F21 should be downloaded as the new BIOS.
In the download are usually combi packages, so a BIOS which is for example M03_R14, is a 32MB combo BIOS, but the flash scripts automatically decide what is the correct version to flash.
Update via IPMI/BMC
First, the simplest option of flashing via the BMC/IPMI WebGUI is described. In the downloaded .zip file are several files for flashing via BMC, the RBU folder and the "image.rbu" file contained therein are relevant. Now you have to log into the WebGUI and navigate to the following point.
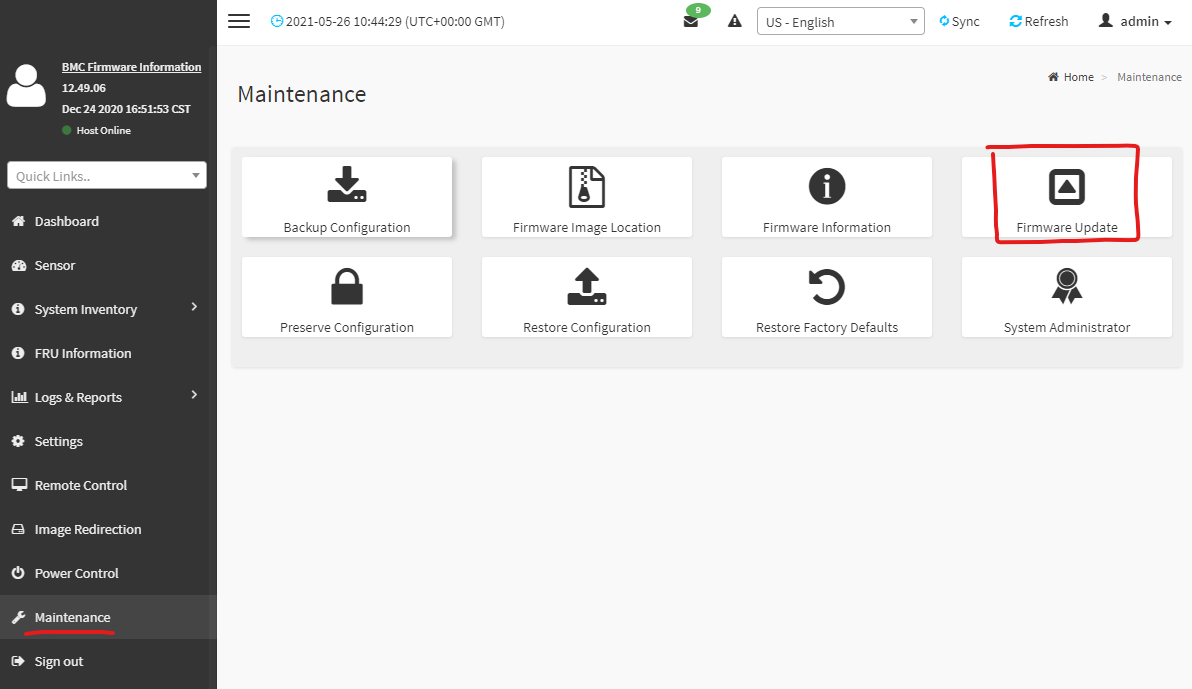
First, go to "Maintenance -> Firmware Update"

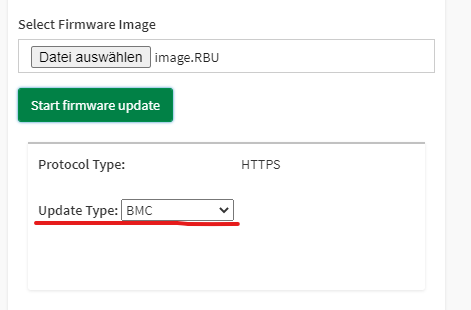
After you have selected the image.rbu file and click on "Start Firmware Update", another drop-down menu appears where you have to change the update type.
By default it is set to "BMC", please change it to "BIOS".
In the next step, you need to click on "Start Firmware Update", first the file will be uploaded to the system and verified. Finally, you need to click on "Start Firmware Update" again to start the actual upgrade process.
After this is done, the system must be rebooted to load the latest BIOS. BIOS settings that have been made must now be reset.
Update via USB-Stick
To update via USB stick, you must also first download the update file and copy the unpacked contents to a USB stick. It is important to keep the folder structure because the update scripts use absolute paths and rely on the folder structure.
Also, the "AfuEFIx64.efi" file must be downloaded manually from the AMI website and copied to the "SPI_UPD" folder.
URL: https://www.ami.com/products/firmware-tools-and-utilities/bios-uefi-utilities/
Select: AMI Firmware Update (AFU) -> Aptio V AMI Firmware Update Utility

AMI website, additional remarks added by us ( Source: ami.com)


At boot, the system must then boot into the "Integrated EFI:SHELL" via a modified boot order. If the Boot Mode Select is set to Legacy in the BIOS Boot tab, the integrated EFI shell does NOT appear as a boot option, the Boot Mode Select should be set to UEFI.
In the EFI shell, the USB stick must be mounted first, this works simply by using the command "fs0:". You may also have to enter "fs1:" or "fs2:", the USB stick may move to a different location depending on whether other file systems are recognized. When starting the EFI shell all connected drives are also listed

Via "cd path\to\update" you have to change to the BIOS download. Use the command "dir" to display the current directory to make sure that you are in the correct folder.
The final command to flash is simply " f.nsh ", the flash process will then run automatically. After a reboot, the latest BIOS should be flashed. BIOS settings are reset during the BIOS flash, if settings have been made, they must be restored.
Was this article helpful?
That’s Great!
Thank you for your feedback
Sorry! We couldn't be helpful
Thank you for your feedback
Feedback sent
We appreciate your effort and will try to fix the article